Repair/Restoration Questions (Photo Request)

The place to come to share your technical expertise, or just find out what the little springy thing is that's just pinged out of sight under the work-bench.
User avatar
nuggitt
Moderator
Moderator
Posts: 5967
Joined: Fri May 22, 2009 9:45 pm
Location: North Yorkshire

Re: EXHAUST! I was extremely EXCITED..... then.... OH CRAP

Post by nuggitt »

kboehringer wrote: The incredibly fast delivery of my exhaust can from PLYMOUTH Devon PL5 2RE (wherever that is?).
Here's a couple of maps of the UK showing where Plymouth is. :D :thumbsup:

Image

Image
Bit of advice. Buy a good bed and a good pair of shoes, because if you aren't in one you'll be in the other.
User avatar
nuggitt
Moderator
Moderator
Posts: 5967
Joined: Fri May 22, 2009 9:45 pm
Location: North Yorkshire

Post by nuggitt »

Knowing you love hard work you might as well finish them off with a good quality BBQ paint. I think I used a satin coat a while ago.

Fit a wire wheel to an electric drill and clean up the cast iron part but take the headers far away from the house, cars and motorbikes because there will be a cloud of brown dust that would look like an atom bomb had just gone off. :lol: :lol:

Image

Image

Image

Image
Bit of advice. Buy a good bed and a good pair of shoes, because if you aren't in one you'll be in the other.
User avatar
kboehringer
Spanner Monkey
Spanner Monkey
Posts: 124
Joined: Sun Jun 30, 2019 9:39 pm
Location: Peachtree City, GA USA

Test Fitting the Exhaust......NOT DONE POLISHING YET.

Post by kboehringer »

FZR Friends,
I decided I had better do a test fit of the exhaust to discover any abnormalities or any additional missing items. I have NOT finished my polishing and I WILL be painting as suggested by Nuggitt and Stig.

But, just in case the seller of this header (State of Minnesota USA) sold me a header that was bent or otherwise not going to fit properly, it seemed prudent to get this test-fitted before I spend the additional countless hours cleaning & polishing.

Overall, it does seem to fit nicely and is vastly better constructed than the aftermarket D&D 4-2-1 header
Image

Once the polishing is complete, this will look STELLAR!
Image
I ordered new exhaust gaskets and the broken ExUp Cable Pulley from Yamaha (Parts due in ~10 Days)

The rear mount bracket used by the PO of this header will not work. Not sure what he was doing with it but it won't work here.
(STIG PM SENT)

Image

My British Exhaust Can looks really BIG! and really COOL! The test fitting shows that the flange is a good bit expanded and the fit is sloppy. The gasket is also shot but I may have something from my XS1100's that can be modified to tighten this up a bit and seal it. A really nice strong WIDE Stainless Clamp will also help.

Image

All of the sudden, the Vintage Yamaha Rally I attend and organize every year seems to be getting REALLY close.

I need to get this bike; SAFE, Running properly, and Looking as good as possible before the end of September! :eek: I suspect strongly this will be the ONLY FZR at the event and I want her to stand out from the crowd of 150 +/- Vintage Yamahas.

SINCE SAFETY IS #1......
I plan to purchase this set of Stainless Steel brake lines. Assuming I can get the bike running very well. She will be getting put through her paces on the "Tail of the Dragon" in North Carolina (many videos on YouTube). I can't afford to be riding a fast bike (or any bike for that matter) on 27 year old rubber brake lines.

I plan to buy these from Exeter United Kingdom unless you would recommend something different?

WEZMOTO BRAKE LINES

CARB TUNING:
I've decided to hold off on any additional tuning attempts util I have the exhaust properly installed and functional. I also need a couple other bits for the carbs. Since the new (OEM) exhaust is going to effect the machine performance it makes little sense to tune the machine twice. I have plenty of other small items to complete.

VALVE CLEARANCE:
Among the many other chores to complete on this machine, I still need to check the valves. With 29,663 miles on the odometer this inspection is certainly overdue. I have found that few (if any) TYPICAL owners properly care for their valves or pay the shop to adjust them. I would seem likely this chore has NEVER been done. So...... 1 more project added to the to-do list for this machine...
Kurt Boehringer
Peachtree City, Georgia USA
1992 - FZR1000 - Genesis
User avatar
nuggitt
Moderator
Moderator
Posts: 5967
Joined: Fri May 22, 2009 9:45 pm
Location: North Yorkshire

Post by nuggitt »

I've always used Goodridge brake lines. They are guaranteed for life.

I didn't know they were guaranteed at the time until one of my Banjo bolts came away from the front brake line. I telephoned Goodridge and spoke to a Mark Tozer ( think he was the boss?) and explained what had happened and I sent him some photos and without any quibbling or arguments he said we'll send you a full kit out to you free of charge. (I was living in Greece at the time)

He said all our hoses are guaranteed for life and we want our customers not only to be happy with our products but we want them to be safe.

When the parcel arrived there was a pair of front brake lines and an added bonus, one for the rear brake too. Now that's service for you.

Now I could be wrong by saying this but I'm sure we do a discount deal with Goodridge brake lines.

Stig will put me right if he'd just stop polishing his bike for 5 minutes.

I've looked on the main site and found the link to Goodridge so click on that Kurt and have a look at the Goodridge link on the left.

CLICK HERE

I've just had a thought, maybe it's just the UK members that get the discount. Not sure on that???
Bit of advice. Buy a good bed and a good pair of shoes, because if you aren't in one you'll be in the other.
User avatar
nuggitt
Moderator
Moderator
Posts: 5967
Joined: Fri May 22, 2009 9:45 pm
Location: North Yorkshire

Post by nuggitt »

You'll probably know this already.

When it comes to fitting your fairing panels back on make sure you use the metal type fasteners as in photo. The fasteners are for a 5mm bolt.

The rubber speed nuts are crap and don't last two minutes especially when they're neat hot exhausts.

Image

Image
Bit of advice. Buy a good bed and a good pair of shoes, because if you aren't in one you'll be in the other.
User avatar
Stig
Site Admin
Site Admin
Posts: 11786
Joined: Wed Sep 28, 2005 7:54 am
Location: Searching for my bike

Post by Stig »

Exhaust bracket is in the post :thumbsup:
AKA Bald headed b'stard
User avatar
kboehringer
Spanner Monkey
Spanner Monkey
Posts: 124
Joined: Sun Jun 30, 2019 9:39 pm
Location: Peachtree City, GA USA

Thank You Sir..... Brake Lines Ordered........ Cables Test

Post by kboehringer »

Stig wrote:Exhaust bracket is in the post :thumbsup:

Thank You Very Much Stig!
:D


Thanks also for the tip on the Brake Lines..... They are ordered!!!!

https://www.goodridge.co.uk/

ExUp Cable Routing & Fitment Test
This evening after work I was able, thanks to the technical section here, find the proper cable routing and verify I purchased the proper cables...

Image
Yamaha sure does make some tight bends in these. :eek: But it is correct per the Technical cable routing drawing.


Not upside down this time either! :retard:
Image

I will follow the instructions and set-up the cables properly. For now this was just a set-up test not ready for running or tuning.

KURT
Kurt Boehringer
Peachtree City, Georgia USA
1992 - FZR1000 - Genesis
User avatar
kboehringer
Spanner Monkey
Spanner Monkey
Posts: 124
Joined: Sun Jun 30, 2019 9:39 pm
Location: Peachtree City, GA USA

Quick Update...

Post by kboehringer »

FZR Friends,

Thanks to some help from my my friends I'm making a little progress today. I'm still waiting on a couple bits but making progress nonetheless.

The dash is pretty much done and that final touch of an extra fancy Key FOB is the finishing touch....
Image

My headers still need a bit of polishing but the paint will take a couple days to dry so I managed to get two full coats of high gloss high heat and header black on the casting like I admired so much from Stig & Nuggitt.

Image

The proper drain hoses have been added to the bowls, routed properly and terminated in the proper location. I received the remote idle adjuster but the terrible PO (previous owner) used an improper bolt in place of the proper adjuster and the threads on carb #3 will need to be re-tapped (hopefully) to accept the idle adjuster's threads. I also need to swap the bowls around so the bowl with the threaded mount (currently on #3) is on #1 where it belongs. That will be a weekend project.

Image

One additional surprise change was my acquisition of a "European" parking lamp to replace the ugly cover provided in the USA. I need to grab the proper bulb & holder but this looks similar to other common lamps so should not be too difficult to find. Even without a lamp currently working, this is (in my opinion) a significant appearance improvement.

Image
I'm known for rewiring entire motorcycles so setting this up should be relatively simple.....

Will post up as more parts arrive....


Thanks FZR Friends.....
Kurt Boehringer
Peachtree City, Georgia USA
1992 - FZR1000 - Genesis
User avatar
kboehringer
Spanner Monkey
Spanner Monkey
Posts: 124
Joined: Sun Jun 30, 2019 9:39 pm
Location: Peachtree City, GA USA

ExUp Cables E & F

Post by kboehringer »

FZR Friends,
I purchased NEW ExUp cables as the used ones I purchased had a slight fray or two. The cables are the same part number except the "E" or "F" ending letter on the designation. My shop manuals make no reference to any difference in the cables.

Side-by-side, the only difference I can see is that the cable adjuster segment is placed offset E vs. F. I'm assuming either cable could be used in either location the difference in the adjuster probably to help make the pair more compact in that area.

Am I missing something?

KURT
Kurt Boehringer
Peachtree City, Georgia USA
1992 - FZR1000 - Genesis
User avatar
kboehringer
Spanner Monkey
Spanner Monkey
Posts: 124
Joined: Sun Jun 30, 2019 9:39 pm
Location: Peachtree City, GA USA

Exhaust installed...

Post by kboehringer »

The Exhaust is on and functional. The machine is EXTREMELY quiet...No more HOOLIGAN loud.

Image

ExUp installed and functional per the instructions found on this forum and the books. I still couldn't find any reference to the differences in the cables (E vs F) and assume the adjuster locations being staggered was to help identify one from the other and to keep them from binding with each other.

Image

Carbs were "Repaired" but now I have a stuck float following the move of bowls, addition of the idle adjuster, and install of the proper hoses.

Image
Kurt Boehringer
Peachtree City, Georgia USA
1992 - FZR1000 - Genesis
User avatar
nuggitt
Moderator
Moderator
Posts: 5967
Joined: Fri May 22, 2009 9:45 pm
Location: North Yorkshire

Post by nuggitt »

Starting to come together Kurt. I'm sorry say this but your still an HOOLIGAN just a quiet one at that. :lol: :lol:

Have I sent you this link before I can't remember?

https://litetek.co/Carb_Kit_Yamaha_FZR1000_89-95.html

Get one of these carb kits for a rainy day and replace the old worn out seals with these. You wont regret it. :D
Bit of advice. Buy a good bed and a good pair of shoes, because if you aren't in one you'll be in the other.
User avatar
kboehringer
Spanner Monkey
Spanner Monkey
Posts: 124
Joined: Sun Jun 30, 2019 9:39 pm
Location: Peachtree City, GA USA

Post by kboehringer »

nuggitt wrote:Starting to come together Kurt. I'm sorry say this but your still an HOOLIGAN just a quiet one at that. :lol: :lol:

Have I sent you this link before I can't remember?

https://litetek.co/Carb_Kit_Yamaha_FZR1000_89-95.html

Get one of these carb kits for a rainy day and replace the old worn out seals with these. You wont regret it. :D
Nuggitt,
No you had not sent that link before to me but I did see it on another posting. I purchased and installed these from China:

https://www.ebay.com/itm/4X-Carburetor- ... 2749.l2649

The bowl gaskets were difficult to work with from this kit but I was able to get everything sealed. I'm certain the kit I purchased was not Buna rubber as it was much too stiff to be Buna. In the states, Gasoline in many locations is mixed with Ethanol for emissions restrictions, Ethanol will very quickly damage any BUNA seals.

I will purchase the kit you recommend and set it aside for that rainy day.

Today, I get to pull the carbs back out again and try to determine what is causing the overflow.

Thanks,
Kurt
Kurt Boehringer
Peachtree City, Georgia USA
1992 - FZR1000 - Genesis
User avatar
kboehringer
Spanner Monkey
Spanner Monkey
Posts: 124
Joined: Sun Jun 30, 2019 9:39 pm
Location: Peachtree City, GA USA

Petrol Issues Continue.... Rebuilding like a Hooligan.

Post by kboehringer »

FZR Friends,
I continue to have problems with my carbs, some of my own making, some related to insects.....

Carb Issues
I've been trying to "dial in the carbs" and there have been a number of issues. Most notably an overflowing of carb #1 & #2. The problems seemed intermittent and I thought I had sorted it when debris was found in #1.

Unfortunately, that was not the case......
Image
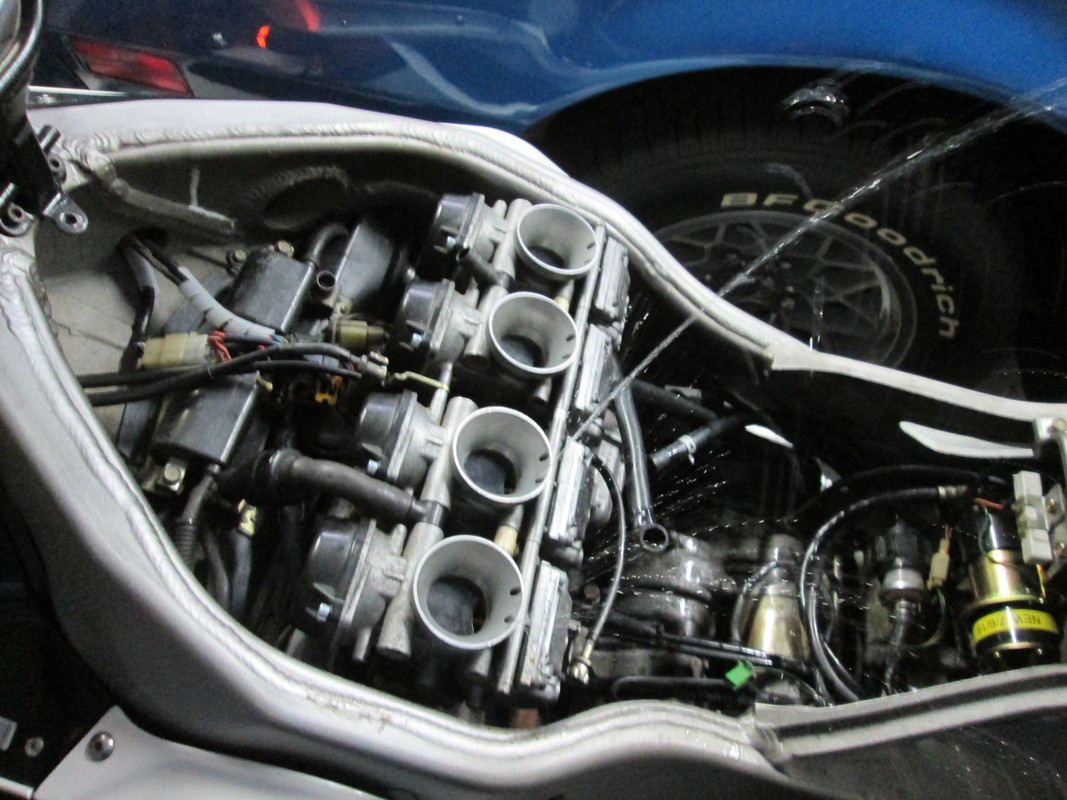
Creating a fountain of petrol from #1 & #2?

I discovered a very faulty float setting on #2 and corrected it. But, WHY WAS #1 doing this?

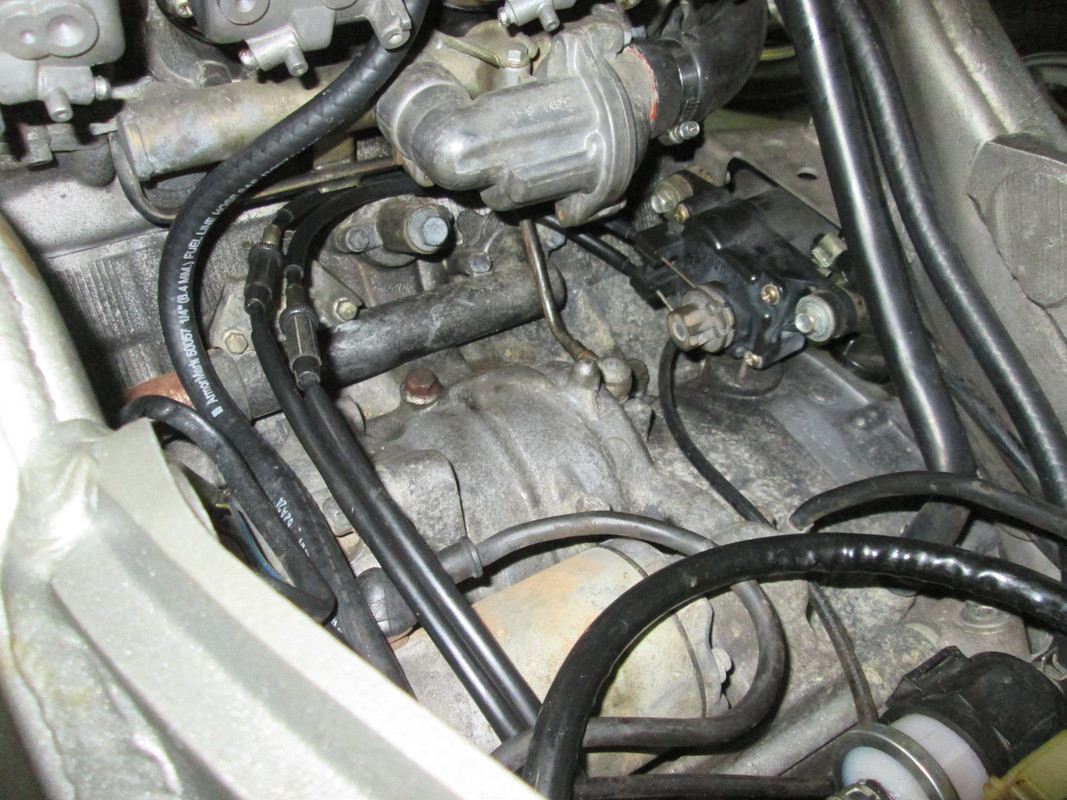
I recently installed the long-missing overflow hoses which were provided by Nuggitt. I did bit of investigation and found the issue..

Image

We have these creatures/insects in GEORGIA USA referred to as "Mud Daubbers" they are similar to a wasp or hornet and build small nests of mud to lay eggs in. While the bike sat for the previous 5 years one of them made a home here.

Since the newly added drain hose had no where to drain it pushed the petrol over into #1 causing BOTH to overflow because of the bad float setting in #2.

Working Like a Hooligan (embarrassed to say it):
While in close proximity to the plugs having removed the carbs again I decided to check the plugs. This should have been one of my first chores but working with excitement to get this machine returned to service I concentrated on all the biggie items and skipped the routine.

Image
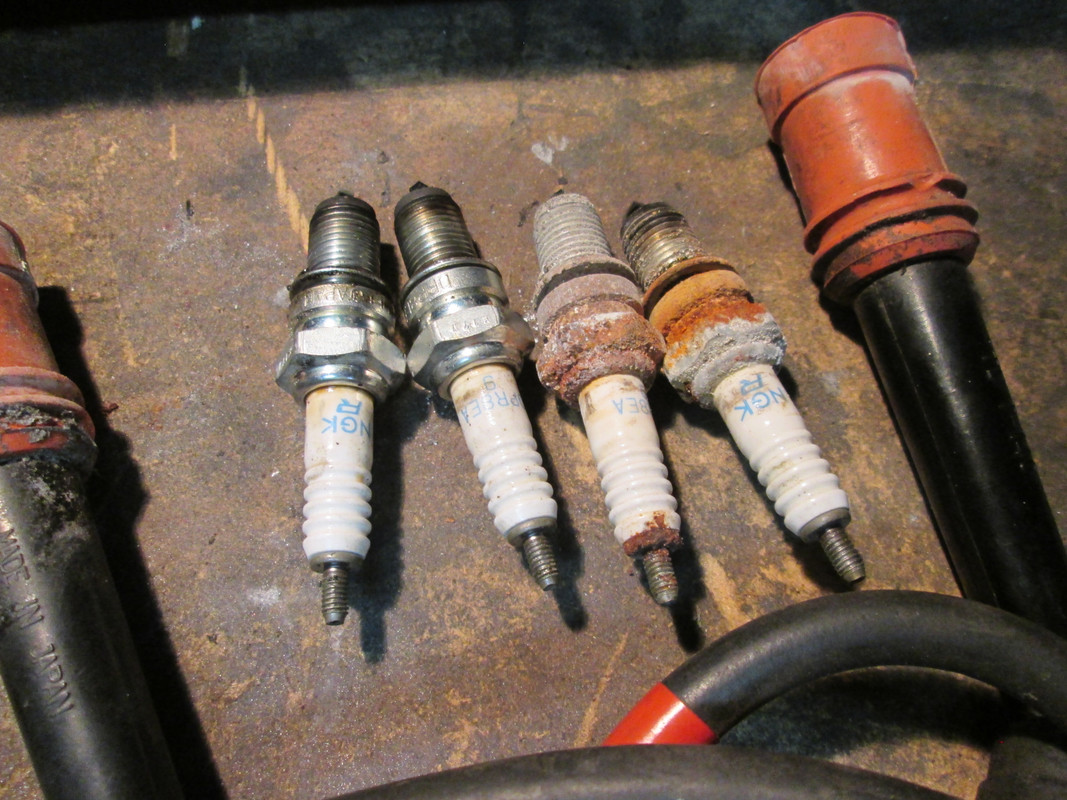
I'm embarrassed to have posted this.... STUPID HOOLIGAN!

The plugs have been replaced with new and the coils have been checked. They pass the primary and secondary OHM checks with flying colors (following a very THOROUGH cleaning (Tidy?).

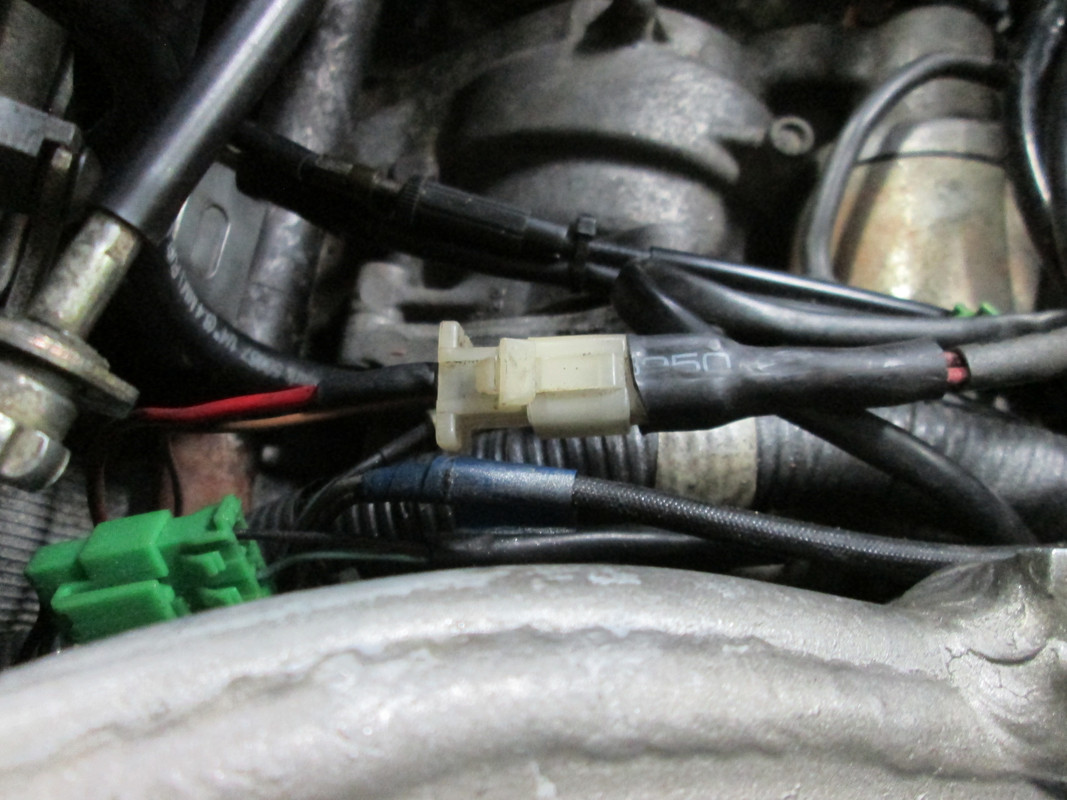
Electrical Gremlins:

I've had a flikering high-beam lamp indicator and a bit of variation in headlamp intensity. Typically, bikes this old need a little attention to the connectors and this one is no exception. I've cleaned quite a few and even replaced a couple connectors that were melted.

Today, I found this one covered up with tape by the previous owner.
Image

I have noticed several used generators for sale on Evil-Bay and most (if not all) have some damage to this connector. It APPEARS this is a typical trouble point for this machine?


I'll get the connector fixed in the morning.... Midnight over here.... Hopefully I can have some greater success with good performance tomorrow.

I've spent several hours looking through old posts and responses looking for bits of information on the carbs and it seems the CLEANLINESS issue is no different for these machines than it is for my others.

Hopefully, the fuel system is now clean....

Respectfully,

KURT
Kurt Boehringer
Peachtree City, Georgia USA
1992 - FZR1000 - Genesis
User avatar
nuggitt
Moderator
Moderator
Posts: 5967
Joined: Fri May 22, 2009 9:45 pm
Location: North Yorkshire

Post by nuggitt »

If you ever saw the previous owner again what would you do or say??

I know what I'd say to him. :finger: :finger: :finger: :finger: :finger: It should be classed as a criminal offence to treat one of these bike in the way he has. :mad: :mad: :mad:

Well Kurt, I've never ever seen a bike taking a leak like that before. :lol: :lol:

Has for "Mud Daubbers" the only thing we get over here that can stop a bike moving is Blackbirds, Robins and the odd mouse making a nest in the engine compartment for most of the summer. Ask Stig all about that. :lol: :lol: :p

You maybe an hooligan but a nice excited one at that. Those plugs look like they were fitted in Japan when it was on the production line at Yamaha. :eek:

You put... I've spent several hours looking through old posts and responses looking for bits of information on the carbs and it seems the CLEANLINESS issue is no different for these machines than it is for my others.

In the number of times I've taken my carbs on and off in the past. I've made sure they were spotless inside and they still give you grief. Temperamental is the word for these carbs. One slight sneeze and they don't want to play anymore. :lol:

Something to think about once you get her up and running is to fit some stick coils from a Honda cbr600. It gets rid of those arcing plug caps and boat anchor coils under your tank. :nod:

Keep up the good work Kurt I'm loving the progress. :thumbsup:
Bit of advice. Buy a good bed and a good pair of shoes, because if you aren't in one you'll be in the other.
User avatar
kboehringer
Spanner Monkey
Spanner Monkey
Posts: 124
Joined: Sun Jun 30, 2019 9:39 pm
Location: Peachtree City, GA USA

Previous Owner...... Plug Repaired

Post by kboehringer »

nuggitt wrote:If you ever saw the previous owner again what would you do or say??
I know what I'd say to him. :finger: :finger: :finger: :finger: :finger:
Nuggitt,
I believe my response to the PO would be the same as yours. Unfortunately, this is one of those "Buyer Beware" deals. It seems obvious by the things I've found so far that the PO was a VERY young man. The silly painting, rear fender mods, run the rear brake down to metal-on-metal, ancient tires, drilled jets, aftermarket "Hooligan" exhaust, and cover it up rather than fix it electrical issues all point toward a "youngster". I paid $800 for the machine and my out-of-pocket so far is certainly over $1500. I expect a bit more before it's all said and done.... Still will be a good deal once complete and with new everything hopefully ready for a few years of trouble-free service (and FUN!).

But, that '89 for sale in the classifieds looks pretty darn good if it wouldn't cost $1000 to get it to the USA I might have already purchased it. :)

I got the bad connector repaired. It's no longer RED but it is repaired properly with spotless clean connectors and heat shrink tubing to help protect it from water entry etc.

Image

I have multiple old Yamaha harnesses so finding a couple good 2-prong connectors wasn't too difficult. There are more than few XS1100 parts re-purposed here on the FZR.

Still working at it.....

Thank You.
Kurt
Kurt Boehringer
Peachtree City, Georgia USA
1992 - FZR1000 - Genesis
Post Reply