 |
| |
| Changing
head bearings
Original article submitted by
Macca
| If you've got the wobbles in sweeping
corners or knocking noises when braking, chances are your head bearings are at
fault. The trickiest part is that during inspection or replacement the front end
of the bike has to be off the ground. How you do it depends on you, who
you know and what you've got. I am lucky because i use a sling over an iron girder
and winch it up, but however you do it, bear in mind that you will be working
in the headstock area A LOT, so it must be as stable as possible but allow full
access to every component at wierd angles. It's better to suspend it with the
weight bearing down WITH the support, rather than the weight bearing down ONTO
the support. And remember the forks are coming off so it will need to be
high enough off the ground to allow them to drop clear. You SO dont wanna be adjusting
the support with the front end attached and flapping around. To do the job
you will need a few vital bits: - New bearings (no shit, Sherlock!)
- Quality
clean grease
- C-spanner
- A drift (straight metal bar approx 12mm
dia 12" long)
First thing, take off the petrol tank and upper
fairings. Loosen every bolt that attaches anything to anything from the handle
bars forward ('cept brake unions!!!!) Install your method of raising the front
and lift it up to approx 18". Give the bike a hard shake, it's better to
find out if the system is good with the front wheel attached and the sidestand
down. |
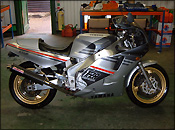  
Click
the thumbnails to view full-size pictures | Next
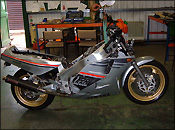
thing is to undo the two sunken allen bolts in the top yoke to release the clip-ons
and then remove the top yoke itself.
Now is also a good time to undo the brake
calipers and loosen the pinch bolts on the bottom yoke all the way out. Release
the pinch bolts on the clip ons and wiggle the forks down so the bars will be
able to come off the top of the stanchions. Slide the fork assembly out from the
bike and stand it up somewhere. | 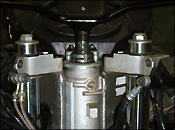 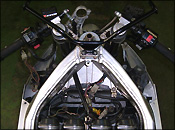
Click
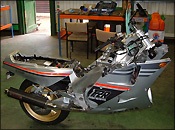
the thumbnails to view full-size pictures | Now
you need the C-spanner to slacken off the two locking washers on the steering
stem, take them off and the top bearing will be loose on the stem, remove it and
slide the bottom yoke and stem out. One bearing will be loose on the top
of the headstock (nice bearing); one is pressed onto the bottom of the stem (bastard
bearing). The races are the shiny inserts in the top and bottom of the headstock
(when wiped clean of grease). Old bearings on the... erm... right. New
races on the... uummm... left. | 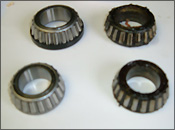 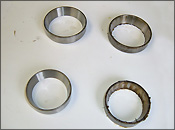
Click
the thumbnails to view full-size pictures | Next
thing is to remove the old races from the headstock. Use the drift and tap the
bottom one out from the top of the headstock and the top one out from underneath.
Make sure you tap them quite gently and in circles, they will move slowly at first,
just keep tapping around the edge and they will pop out. To remove the bottom
bearing from the headstock is quite tricky. My only advice is don't be shy, the
thing was pressed on at the factory and you aint gonna use it again. Just make
sure you do not damage the yoke or stem in the process. Doing it by hand is preferable
to using a power tool, you have more control and a better feel for when it goes.
I use a cold chisel and tap round the base in the same way as the races, holding
the yoke secure in a soft jawed vice. Once you have got this far, have a
smoke and a cuppa, then clean EVERYTHING you have taken off, you prolly ain't
going this far in for a long time and there will be no visible signs of all this
hard work so while you're here... A big hint for installation is to use
the old components as drifts to install the new ones. A bearing turned upside
down is the same diameter as the new one going in and will absorb any impact damage. Also
make sure that any washers under bearings are put on before the bearing is. Re-grease
the headstock and slide the new bearing onto the stem as far as it will go. Slide
the old bearing on upside down and tap the new one home until it is flush with
the stem base. | 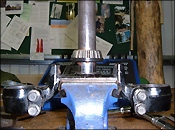 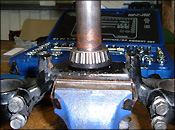 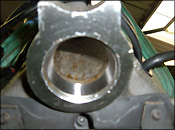
Click
the thumbnails to view full-size pictures | Grease
the grooves the races sit in and tap home the new ones until they are flush all
the way round the inner collar. Now give all the new components a good coating
of grease and work it into the bearings.
Reassemble the front end in reverse
order that you dismantled it. Once everything is back together, tighten
the fork clamp bolts all the way and the headstock locking nuts finger tight,
then lower the bike to the floor. This will allow the bearings to sit properly
in the races. Tighten everything to Mr Yamahamotosan's enlightened torque
settings (ahem) and re-check everything is secure. You will notice some
unusual handling charactaristics shortly after carrying out this procedure but
they are temporary and you will become accustomed to them quickly. Symptoms include
actually going where you are pointing mid-corner, holding the line and smooth
steering. The sound of a whore's headboard banging during braking is also likely
to disappear. Now you can go do stuff like this again. 
Click
the thumbnail to view full-size picture
Yay.
|
| | |
www.exup1000.co.uk is owned and
run by EXUP enthusiasts, for EXUP enthusiasts
Hosted by Digital Picsel
|


