 |
|
|
|
Bling wheels
(or how to polish your rims)
Original article submitted by
Stig
Stig, a prominent member of our forum and
partner in the Exup1000 website, decided he'd had enough
of his standard white wheels and wanted something a
wee bit more interesting. No, he didn't blow his last
two years' savings on a set of Marchesinis, he donned
his overalls and imagination and breathed new life into
his existing wheels with excellent results.
The original cast finish was starting to
wear through the micro-thin paint on the spokes after
years of faithful service so it had to go. Stig started
work by stripping the paint from the old rims. The rims
being the main feature of his idea he decided to concentrate
the majority of his attention and work to that area
of the wheels, leaving the original main spokes' paint
to act as an undercoat to the new paint that would eventually
be applied.
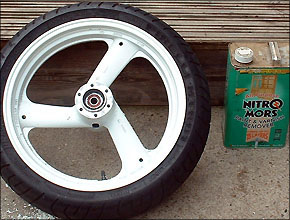
The best way to start the process is by
using a good brand of paint stripper; Stig decided on
Nitromors, applying the stripper as directed on the
can to the outer edge of the main rims.
|
 |
 |
|
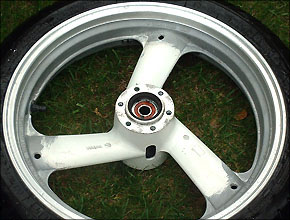
Once the solution had run its course he
started rubbing back the casting marks on the rims using
180 wet & dry.
He then moved on to the suicidal bit of
this kind of job, rubbing down, in all its lovable stages.
Stig started the wet & dry process with 400, then
600, 800, 1200, 1500 and finishing with 2000 where needed,
using each of the papers sequentially satisfying yourself
with the results before moving on to the finer paper
stage. Now he had a smooth even surface to a pleasant
polish, but not polished enough, so on to the polishing
kit. If you don't already own one they can be obtained
from most auto shops, bikes or cars and they will save
you a lot of pain and suffering when rubbing down. The
polishing kit starts with rough grades of wax on a buffing
wheel attached to a drill. You slowly use finer cutting
grades of wax to achieve the same effect as the wet
& dry. Whichever method you go for it's a messy
and tedious job.
You'll know when you've done enough polishing
as the scratches created by the previous grades of wet
& dry will gradually disappear. A point worth mentioning
is to be sure you always work in the same direction
when polishing.
|
 |
 |
|
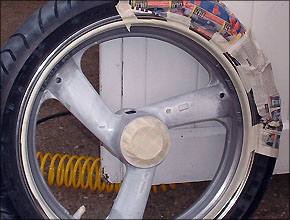
Now for the painting process. Stig masked the polished
areas of the rims he'd worked on, being sure to cover
the bearings and threaded holes in the centre of the
hub. He use a roll of 1" masking tape and old newspaper
to do this. Patience is a virtue during this process
as following the exact edge of the polishing with a
straight flow of tape can be quite tricky.
Stig applied etching primer to all areas
of the exposed wheel, just a single coat to bond the
remainder of the paint to the wheel and smooth out where
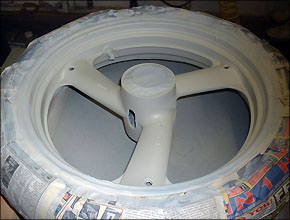
the'd rubbed down the rough casting marks. Once that
was dry he applied 6 coats of filler primer to build
up a thick base coat that'll take care of minor surface
imperfections - more serious ones can be filled with
stopper (cellulose putty). This base then needs rubbing
down again, the smoother the better.
|
 |
 |
 |
|
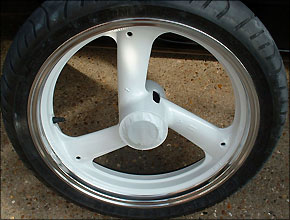
With the base coat preparation complete,
Stig moved on to the paint. He opted to use cellulose
paint rather than 2-pack, as the the latter is carcinogenic
and using it without proper ventilation equipment can
be a serious health hazard. Four coats on the wheel
gave a deep brilliant colour and shine. Once the paint
has fully hardened off, unmask the wheel and use rubbing
compound (similar to T-Cut) to really bring up the lustre.
And there you have it, bling! The whole wheel took about
three days... on and off.
Stig did all the rubbing down by hand,
'cos he's a nutter, but a polishing kit will spare you
the blisters! To keep your polished rims looking like
new he recommends Autosol or Mother's (much beloved
of the US custom scene) - don't lacquer them because
they'll lose their shine and if moisture gets under
the lacquer they'll go manky very quickly, and you'll
have to start all over again...
|
|
|
|
www.exup1000.co.uk is owned and
run by EXUP enthusiasts, for EXUP enthusiasts
Hosted by Digital Picsel
|
